
Project: Three bird chicken coop with removeable run

Okay, here it is, the Pocket Farm chicken coop and run project.
These instructions are best used in conjunction with the plans which can be downloaded here and the photos which accompany the text below.
This is a project that I have just completed and road tested with my three new hybrid hens. They seemed to settle in very easily so I can say with authority that it works in practice and not just theory however, please feel free to tinker with the dimensions, design and features to suit your own requirements.
For instance, I have incorporated swing doors for both access and pop hole where you may prefer a more traditional sliding design for the pop hole. I have also tried to do away with roofing felt – a traditional favourite haunt of the dreaded red mite – by using small gauge corrugated plastic roofing instead but it remains to be seen how effective this is and you may prefer an alternative solution.
What the basic design does offer is spacious, sturdy, safe, well ventilated and easy accessible accommodation for up to 3 hens or 4 bantams. Have fun and remember that a splinter or two is a small price to pay for the satisfaction you get from having built your own coop.
Suitable for 3 large fowl or 4 bantams
Time: a weekend
Cost: approx. £220 (shop around for the best deals on wood as prices and quality vary greatly)
What you need:*
Wood 50mm x 50mm baton 50mm x 25mm baton Exterior Plywood – one 2440mm x 1220mm (8’x4′) sheet 12mm
Fixings Wood screws 40mm and 70mm Fencing staples 20mm Panel pins Chicken wire or weld mesh Corrugated plastic sheet Door hardware including locks, catches and hinges Exterior varnish Wood preservative White PVA wood glue
Tools Mitre or tenon saw Screwdrivers Wire cutters/tin snips Drill Square
The build
Depending on how well equipped your workshop is, it is a good idea to get your timber merchant to cut as much of the wood to length as possible. An 8ft sheet of plywood in particular can be difficult to handle without suitable equipment. Those of you who have more than my rudimentary carpentry skills may want to join your wood more professionally than just butting them up and screwing them together as I have, but this does build into a very sturdy structure so the extra time required may not be worth it.
I used treated timber for everything except the ramp and the perch which the hens would be in contact with for longer periods of time. It is recommended that you cut treated timber in a well ventilated area or outside and wear a protective face mask to avoid inhalation of dust.
Start by creating the main frame from 50mm x 50mm. Our coop is based on a 3ft x 3ft interior frame. The back legs are 15cm (6 inches) shorter than the front to ensure adequate pitch for the roof. Cut the top of the uprights so they have a 12-15 degree angle. You can do this by placing the corresponding front and back legs 3ft apart and placing another length of wood at the correct angle across them and then marking where to cut.
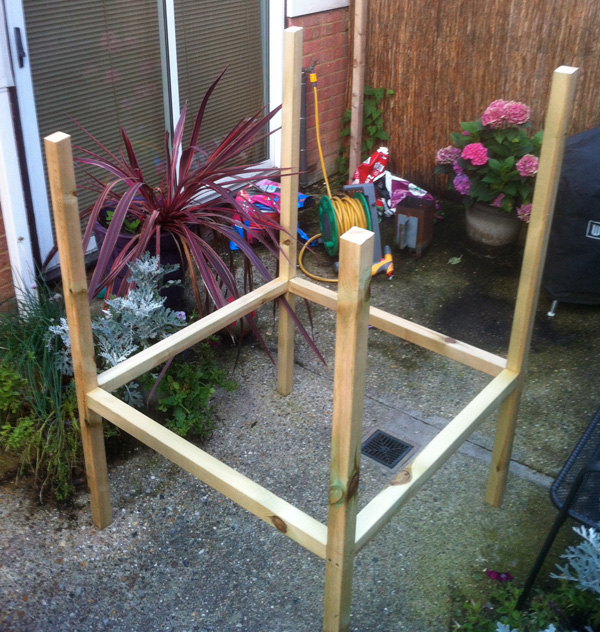
Assemble the internal frame, keeping all angles square. If need be you can insert temporary supports at the top of the frame to keep everything evenly spaced. When the frame is assembled cut notches in the corners of the 3ft square plywood floor panel to accommodate the legs and secure to frame with screws. Drill a pilot hole in plywood before inserting screws.

The pop hole is located in the tall front panel but at this point you will need to decide which side to have your main door to give you best access when it is placed in its final position. Build internal door frames from 2 x 1 baton to size required – about a foot square should be adequate for the pop hole. The main door should be large enough to allow easy access for egg collection and cleaning. You can also create the roof supports at this stage.


The roof support as seen from inside
Decide where nest boxes will be and section off with baton glued and screwed to the floor. Make a bracket for perch at this point. The perch can be any shape but should have smooth or rounded edges. Use untreated wood. Cut the ship lap to length ensuring the the front and back panels overlap each side by the width of the ship lap so everything lines up when you make the sides. Screw to frame to form outside shell. Remember to create ventilation holes back and front – these should have fine mesh fixed behind then to keep mice and other undesirable visitors out. Use PVA glue between all joins to discourage red mite. Remember when cutting the ship lap for the areas around the door frames that you need to leave a lip for the door to close on to on all sides of the opening – about half an inch is fine.


Front panel ventilation slot with mesh visible behind
Cut the door surround sections from ship lap and fix to frame and then assemble the door sections from the reminder of the planks and brace with batons and glue.
 The side access door ready for installation
Fix the doors in to the frame with gate hinges and add a suitable bolt lock, preferably one you can padlock if need be. Seal the edges of ply used for the roof with PVA glue and use exterior varnish for the flat surfaces. Cut the corrugated sheet to length (exactly in half for the size we are creating here if you have a standard 2.4m length) allowing a few inches overlap on each side and fix to roof with appropriate fixings. Remember that you should screw or nail your fixing into the peaks not the troughs of the corrugated sheet to avoid water seeping in to the holes over time. Use a double row of fixings where the sheets overlap.

Add hinges to the front and catches to the back of the roof. Make a ramp with steps – made from strips of baton – glued and nailed every 15cm (6 inches) and fix with hook and eye just below door.

If you are extending the run under the coop, as I have, you will need to add 50mm x 50mm batons between the bottom of the legs and 50mm x 25mm at the top of the legs to attach the chicken wire or mesh to. Finally coat the outside with ‘chicken safe’ wood preservative and the inside with exterior grade varnish to created a smooth surface that is easier to clean and disinfect.
The Run
The run is very simple to assemble as it is just a set of frames that are screwed together to form the final enclosure. It is constructed entirely from 50mm x 25mm (2″x2″) treated baton. Assemble frames for the sides, top and one end referring the diagram here.
Attach wire mesh using 20mm fencing staples. Ensure that you keep the wire taught and that the frames stay square. Screw together the sides and end panel and insert a brace at about 18 inches (to align just below the bottom plank of shiplap on the coop) between the front uprights.

Wire ends held securely between panels for a neat finish
Note: For a neat finish try to catch the cut ends of wire between frames except at the bottom where you can leave them sharp to deter burrowing animals. Brace the top with cross members as shown in the diagram and attach the lid with hinges. Add a catch to the front. For extra durability the lid can be braced in the corners as shown below.

Fill the gap created by the ship lap at the front of the coop legs with pieces of 50mm x 25mm batten. Align the run with the coop and secure using catches or screws for a permanent fixture.

The finished coop is sturdy and spacious
You should consider what measures to take to stop rats, foxes and other predators burrowing under the run and in to your enclosure. This can be achieved in many ways, a buried wire floor, the use of paving slabs etc and you should choose the one that suits your situation best.
Addendum
After living with the design for a week it became apparent that a run of this height – even a removable one – would benefit greatly from a side door. Even the simple solution shown below makes the regular tasks such as collecting the feeder and drinker and shutting up at night so much easier that I would recommend you add this feature in too. Other than the door the only other addition to the structure that you will need is a brace piece across the run to stop the door suports wobbling. 
*Note: Finished wood sizes and lengths supplied vary drastically from supplier to supplier therefore this project outline is provided as a guide only and no guarantees of accuracy are given or implied. Please make sure you take your own measurements and estimate your own quantities before purchasing materials or assembling the project.
1 Comment
Leave a reply
Poultry categories
Most recent Poultry articles
- Preventing egg laying problems in older hens with implants 15th March, 2017
- Integrating new chickens into an existing flock 15th May, 2016
- The nests in my heart – a personal view of ex-battery hens 22nd March, 2016
- Chicken FAQ: your most common chicken keeping questions answered 19th January, 2016
- Hens and herbs – no this is not a chicken recipe 08th October, 2015
- Feeding chickens: a balanced diet for backyard hens 16th April, 2015


About Pocket Farm
Pocket Farm is a community for like minded people interested in self-sufficiency, farming, conservation, ecology and rural crafts.
© Pocket Farm Magazine, 2025. All rights reserved.


Not entirely sure where nest boxes could go in this coop without making it difficult for three birds to jump onto the perch. If the pop hole was next to a corner that would give more space, but enough for them to jump up?
I had some orpingtons that struggled to reach a low perch in a large shed, could birds manage in such a confined space?
Also, how high should the perch be, head/tail room?
Good build/design I would follow if I got answers on those questions, thanks!