Paracord weaving: make a survival bracelet

Paracord weaving is a craft activity that can be enjoyed by all the family. You could argue that it’s the next step on from the current loom band craze, although, while the principles are quite similar, paracord has been in use much longer and the items you can make using this versatile material are infinitely more useful.
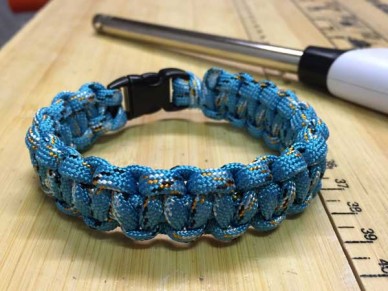
Here, as an introduction, you will learn how to make a survival bracelet from 550 paracord using one of the simplest, but most effective, knotting patterns known as the Cobra or Solomon. The idea is that this provides a convenient way of carrying 8-12 feet of very handy cord that can be used in all manner of survival situations as lashing, bow string, tourniquet, washing line or 101 other uses. Buckles are available with whistles and flints and I have even seen flexible saws woven into the core of bracelets making them even more invaluable in a tricky situation. If you get the bug then you can then progress to other projects as diverse as watch straps and dog collars or mesh bags to handle wraps.
Materials
All materials are easily and cheaply available on the internet from UK suppliers. Paracord is usually sold in multiples of 100 feet but some companies supply shorter lengths. Buckles come in plain or survival style that incorporates a whistle and firelighting flint and are available in several sizes. We used 25mm buckles for our bracelet. Bracelet buckles are slightly curved so it is easy to tell which is the top and bottom. Alternatively, you can create bracelets without a buckle using a knot and loop design which is covered briefly towards the end of the article.

This project is easily completed weaving in your hand but if you want to take on some more complex designs you might find it worthwhile buying or making a simple jig
You will need
8-12ft (210mm – 360cm)550 paracord
25mm plastic buckles
Tools
Scissors
Lighter
Pliers
Weaving jig (optional)
Method
First cut the paracord to length. For this project you will need about a foot (30cm) of cord for every inch (2.5cm) of weave but this will vary with design and width for other projects – add an extra 6 inches (15cm) for luck as it’s better to have too much than too little. Measure your wrist and then add an inch (2.5cm) or so to account for the thickness of the cord in the finished bracelet. This is only a guide and may need some experimentation and adjustment according to your needs.
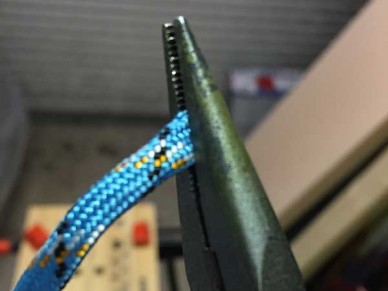
Melt the cut ends of the cord with a lighter (using the bottom of the flame and trying not to set the cord alight) and pinch with piers to seal and flatten the ends. The melted nylon is very hot so be careful not to let it touch your skin – see pics below.


Find the centre of the cord and push a loop up through the female end of the buckle, pull it through until you can reach through the loop and pull the ends of the cord up through it. Tighten to attach it to the buckle.


Attach the female end of the buckle using a simple cow’s hitch knot
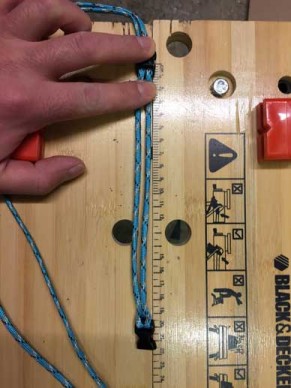
Keeping the cords aligned feed the flattened ends down through the top of the male end of the buckle. Slide the buckle down to adjust the length as required as shown below. The measurement should be taken from the end of the female end to the ridge halfway down the male end – do not include the length of the prongs as these reside inside the buckle when fastened.


You are now ready to weave.
For the purposes of this demo we are starting on the right but you can start either side. As with most weaving it is essentially repetition of a number of steps to achieve a consistent pattern.
Straighten everything up and then with the free right hand cord make a loop and pass the cord over the centre strands and under the left hand cord.

Take the free end of the left hand cord under the centre strands and up through the loop created originally by the right hand cord. As you pull tighter you will see you have captured the centre cords in a simple knot.


Carefully synch up the knot so that it tightens on to the buckle. This is the most difficult bit and it is easy to alter the length of the bracelet at this point so check when the first knot is tightened and adjust if necessary as it is impossible to do later without undoing the weave completely.

Now repeat on the other side
Create a loop with the left hand cord with the free end going over the centre cords and under the right hand cord. Bring the right hand one under the centre strands and up through the loop, synch up and repeat for the length of the bracelet keeping the knots tight throughout.

The Cobra weave pattern emerges as you continue knotting
The video here demonstrates the Cobra weave knot more clearly
When you get to the end and there is no more room for knots turn the bracelet over and cut the spare ends of cord leaving approximately 3-4mm on each. Bend the end of the bracelet back on itself to help the cut ends stand proud of the rest of the weave. These ends can then be singed carefully with a lighter and moulded flat with a blade or similar implement while they are soft.


The neatly finished ends of the paracord
Despite being very effective the Solomon or Cobra weave is considered a basic technique. There are, of course, many different – some very much more complicated – patterns you can experiment with and there are many resources both on the internet and in print that will be invaluable as you progress.

(left to right) Cobra or Solomon, Fishtail and Jawbone patterns

Alternative fastening can be created with a Celtic knot and loop
Try searching ‘boredparacord’ on YouTube or for Paracord Outdoor Gear Projects: Simple Instructions for Survival Bracelets and Other DIY Projects in your favourite bookshop.
Crafts categories
Most recent Crafts articles
- Paracord weaving: make a survival bracelet 17th January, 2015
- Picture tutorial: Make a PVC pipe bow 03rd January, 2015
- Shake it up – handmade coconut shell maracas 05th November, 2014
- Craft Project: Handmade Bamboo Flute 30th October, 2014
- Craft project: DIY bottle cap tambourine 21st October, 2014
- Project: Making a CD drop spindle 24th April, 2014


Leave a reply